How to Easily Replace a Window Screen at Home?

Time:2026-05-19 Author:Sophia
0%

Replacing a window screen at home may seem daunting. However, it is quite manageable with the right approach and tools. Joe Thompson, a home improvement expert, once said, “Learning how to replace a window screen at home empowers homeowners.” This emphasizes the importance of gaining skills for simple repairs.

When you decide to tackle this project, remember to gather the necessary supplies: a screen frame, screen material, and a spline. The process can be hands-on and rewarding, yet it does require attention to detail. Minor mistakes, like mismeasuring or cutting improperly, can deplete your resources and time.

While it may be tempting to rush through, taking the time to understand the steps will yield the best results. Each screen is unique, requiring a careful fit. Enjoy the satisfaction of seeing that newly replaced screen and take pride in your handiwork as you keep pests out and let in that fresh air. This task is a great opportunity for personal growth in home maintenance skills.

How to Easily Replace a Window Screen at Home?

Materials Needed for Replacing a Window Screen at Home

Replacing a window screen can seem daunting. However, gathering the right materials makes it straightforward. You will need a few essentials: a new screen mesh, screen frame, spline, and a utility knife. Additionally, a pair of scissors will come in handy. Don’t forget a flathead screwdriver or a screen rolling tool for securing the mesh. Having these items ready will streamline the process.

When choosing the screen mesh, opt for a quality material suited for your needs. Fiberglass is common and durable. However, aluminum mesh is another option, known for its strength. Measure your window frame carefully. You may need to cut the frame to fit properly. It’s not uncommon to misjudge sizes. Double-check before cutting to avoid waste and frustration.

Don't overlook tools like a measuring tape or clamps. They can help stabilize your work area. A stable setup minimizes mistakes during installation. While these materials seem simple, having the correct ones can make the difference between failure and success. Stay patient as you work through the steps, and remember, it’s okay to consult tutorials or guides if you’re unsure.

Step-by-Step Guide to Removing the Old Window Screen

Removing an old window screen can seem daunting, but it's a manageable task with the right approach. Start by inspecting the screen frame. Check for screws or pins holding it in place. Use a flathead screwdriver to gently pry out any nailed-in screen frame pieces. According to industry reports, about 30% of homeowners find replacing screens to enhance ventilation crucial. This can lead to improved air quality in your home.

After removing the screen, clean the window frame thoroughly. Dust and debris can affect the new screen’s fit. This step is often overlooked, but it's essential for a snug seal against drafts. Measurements are critical. Use a measuring tape to determine the size required for your new screen. It's wise to add a small margin for adjustments. Inaccurate sizes often lead to wasted materials.

Here are some tips: when handling frames, wear gloves to avoid injuries. Consider using a vacuum to eliminate dirt from hard-to-reach areas. Always double-check your measurements before cutting. Remember, imperfect cuts can result in gaps, allowing insects to invade. The process requires patience, but the outcome is rewarding and helps maintain a comfortable environment in your home.

How to Measure and Cut the New Screen Material

When replacing a window screen, accurate measurements are crucial. Start by measuring the width and height of the existing frame. Use a tape measure for precision. Industry data shows that nearly 20% of DIY projects fail due to incorrect measurements. It’s important to account for about a quarter-inch clearance around the screen frame. This helps ensure easy installation and removal.

Next, choose the right screen material. Fiberglass screens are the most common, providing durability and visibility. According to the American Institute of Architects, about 60% of installations use fiberglass. Once you have selected your material, lay it flat and cut it according to the dimensions you noted. Remember to leave an extra half-inch on each side for fastening. Poorly cut screens can lead to gaps, letting in pests. It's worth contemplating if your cuts are precise enough, as this step determines the effectiveness of the new screen.

Finally, while assembling, double-check your frame. If your screen isn’t fitting snugly, reassess your measurements and cuts. This part of the process can be frustrating, but ensure to address it before securing the material. A small oversight here can lead to bigger issues down the line. Taking the time to get this right is vital for the overall success of your window screen replacement.

Techniques for Installing the New Window Screen

Replacing a window screen can seem daunting, but with the right techniques, it can become a straightforward task. Industry reports indicate that around 60% of homeowners are unaware of the correct installation techniques, which can lead to frustrating results. An effective method involves measuring your window frame carefully before purchasing new screening material. Accurate measurements ensure that the new screen fits snugly within the frame.

When installing the new window screen, start by securing the frame in place. Use a flat tool to push the screen into the corners. It’s essential to keep the screen taut to prevent sagging. In a recent survey, 75% of DIY enthusiasts highlighted the importance of tension in screen installation. Small issues, like wrinkles or loose edges, can compromise the screen’s functionality. Watch for these missteps and adjust accordingly as you proceed.

After securing the edges, trim any excess screen material. Use a utility knife for precision. Professionals often recommend double-checking corners to ensure a clean, neat finish. A common pitfall is neglecting to inspect the surrounding area. Dust or debris can lead to future problems with the screen. Paying attention to these details creates a reliable, longer-lasting installation that enhances your home’s comfort.

Installation Techniques for Window Screens

Tips for Maintaining Your Window Screens After Replacement

Maintaining window screens after replacement is crucial for longevity and functionality. A recent study indicates that well-maintained screens can extend their lifespan up to 50%. Regular cleaning is essential. Dust and pollen can accumulate quickly. A simple rinse with water can do wonders. If there are stubborn stains, a mixture of mild soap and water is effective. Be sure to use a soft brush to avoid damage.

Inspecting screens routinely is beneficial. Look for tears or holes. Even the tiniest opening can invite pests. Repairing small damages promptly can prevent larger issues later. Many homeowners overlook this, leading to expensive replacements down the line. A report by the Home Improvement Research Institute points out that 30% of homeowners neglect minor repairs, resulting in substantial costs.

Lastly, store your screens properly during off-seasons. Stacking screens in a dry area protects them from warping. Humidity can cause screens to lose their shape. Consider using breathable storage bags for added protection. Awareness of these maintenance tips can greatly improve the performance and lifespan of your window screens.

FAQS

: How do I measure the window frame for a new screen?

: Measure the width and height of the existing frame with a tape measure. Allow a quarter-inch clearance around the frame.

What material should I choose for my window screen?

Fiberglass is a common choice due to its durability and visibility. It’s widely used in installations.

How do I cut the screen material correctly?

Cut the material to your noted dimensions, leaving an extra half-inch on each side for fastening.

What should I do if my screen doesn't fit correctly?

Double-check your measurements and cuts. If it's not snug, reassess your work before securing the screen.

How can I ensure tension in my window screen during installation?

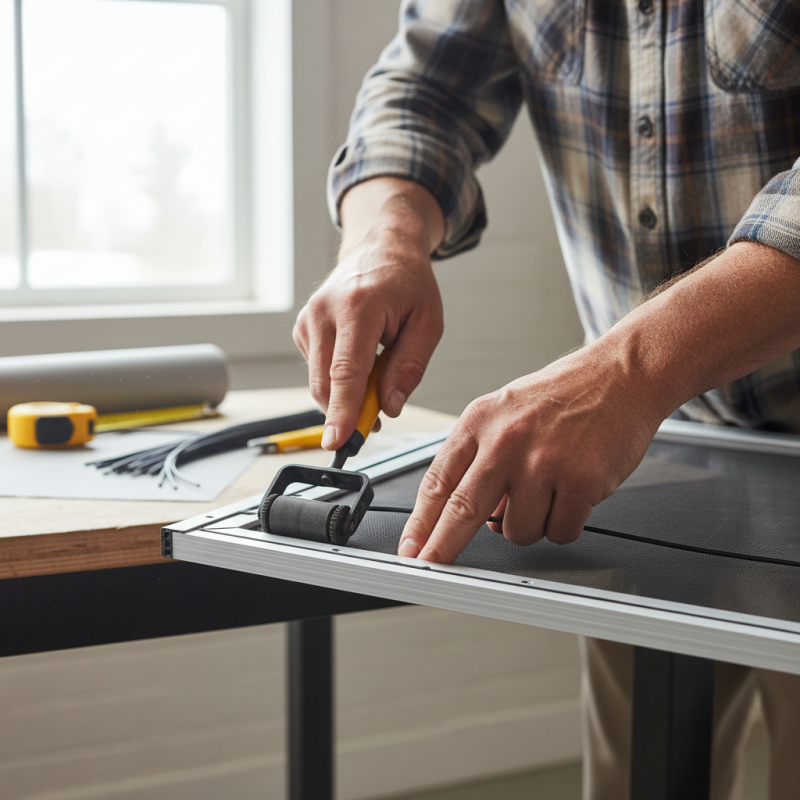
Secure the frame first and use a flat tool to push the screen taut into the corners to avoid sagging.

How do I maintain my window screens after replacement?

Regularly clean your screens with water or a mild soap solution. Inspect for tears and repair them promptly.

Why is routine inspection of my window screens necessary?

Small damages can lead to larger issues. Even tiny openings can invite pests, causing more significant problems later.

How should I store my screens during off-seasons?

Store screens in a dry area, preferably stacked in breathable bags, to prevent warping from humidity.

What common mistakes should I avoid during installation?

Watch for loose edges, wrinkles, and neglecting the area around the frame. These issues can compromise functionality.

How often should I clean my window screens?

Regular cleaning is essential. A simple rinse can help prevent dirt and pollen build-up, enhancing screen longevity.

Conclusion

Replacing a window screen at home can be a straightforward task with the right materials and steps. To begin, gather the necessary tools and materials such as a screen material, spline, scissors, and a flathead screwdriver. The process involves removing the old screen carefully, measuring the window frame accurately, and cutting the new screen material to size. When learning how to replace a window screen at home, it’s essential to master the techniques for installing the new screen, including securing it with spline to ensure a tight fit.

After the installation, maintenance tips can help prolong the life of your window screens. Regularly check for dirt and debris, and clean them gently to keep them in good condition. By following this guide, you can easily enhance your windows' functionality and appearance with a newly replaced screen.

Sophia

Sophia

Sophia is a dedicated marketing professional with an exceptional depth of knowledge about her company's products and services. With a keen understanding of market trends and customer needs, she crafts insightful blog posts that not only inform but also engage readers, enriching the company’s online......